
How to Transfer Data from OST to PST in Microsoft Outlook
Learn how to efficiently transfer data from OST to PST in Microsoft Outlook with this step-by-step guide for easy file conversion.
If you configure an Exchange, Microsoft 365 or IMAP account with Outlook, it stores your mailbox data, including emails, drafts and calendar items, locally in the form of OST (Offline Storage Table) files. These files are used to provide offline access of Outlook data to a user. However, there are times when you might need to transfer your mailbox data from an OST file to a PST file. This can be due to several reasons, such as data migration or server failure. In this blog, we will discuss scenarios when and how we can transfer mailbox data from an OST file to a PST file.
Reasons for Transferring Data from OST to PST in Microsoft Outlook
Here are some of the situations where you might need to transfer mailbox data from an OST file to a PST file:
1. OST Integrity Issues: If an OST file reaches its maximum size, it becomes susceptible to corruption and errors. In such case, you might need to reduce the size of the OST by moving some of your mailbox files to a PST, which can act as an archive.
2. Creating Mailbox Data Backup: While troubleshooting an error in Outlook, it is important to take a backup of your mailbox data to ensure its safety. In such a situation, you can export your data to a PST file and save it as a backup file, which can be used if something goes wrong during the troubleshooting process.
3. Orphaned OST: The OST file becomes orphaned if your email account is disabled or deleted from the Exchange server. Since OST file cannot be imported to Outlook, your mailbox data becomes inaccessible and you might need to transfer data from the orphaned OST to an importable PST file.
4. Data Migration: Situations may arise when you are required to transfer mailbox data from one account to another. Since OST files are fundamentally non-transferable, you will need to convert your OST file into a PST file to go ahead with the migration.
5. Server Failure: When your Exchange server or mail server crashes, the OST file can become inaccessible for Outlook and you may lose access to your mailbox data files. In such scenario, you might need to transfer files from your OST to a PST file
Methods to Transfer Data from OST to PST in Microsoft Outlook
Here are a few ways you can try to transfer your mailbox data from OST file to a PST file:
Method 1: Drag and Drop Emails
If you need to move a few selected files from your OST into a PST file, you can use this method. You will have to create a new PST from Outlook, drag the email you want to move into the PST and drop it in the PST created by you. Here are step-by-step instructions to do this:
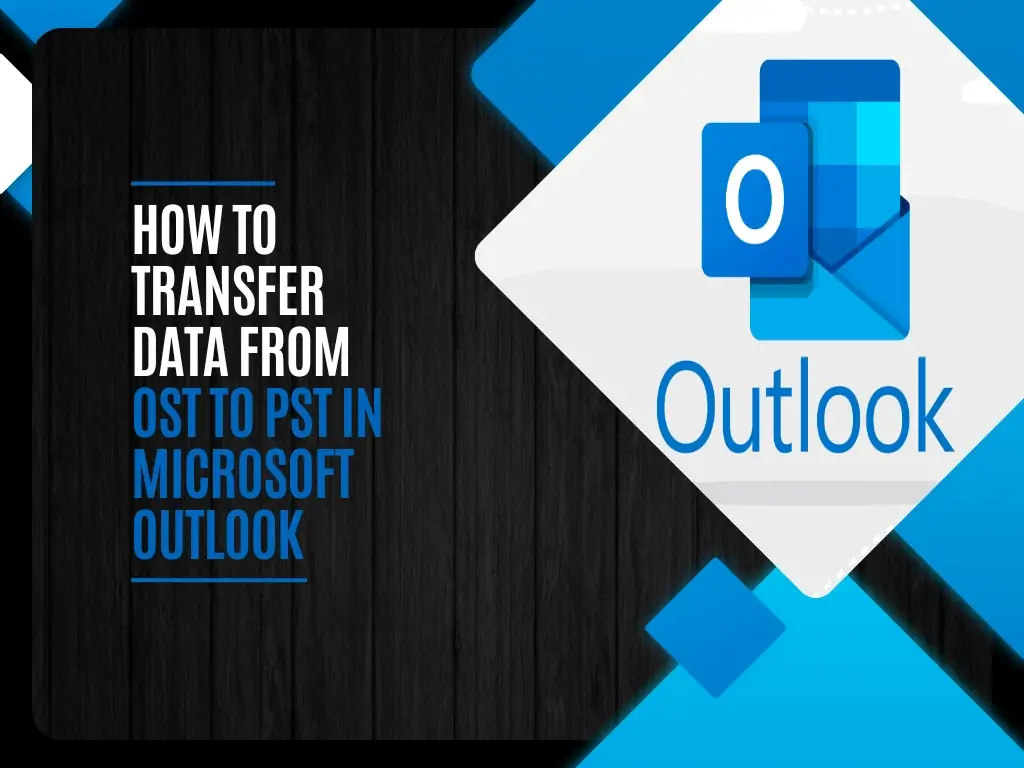
1. Go to Home > New Items > More Items > Outlook Data File.
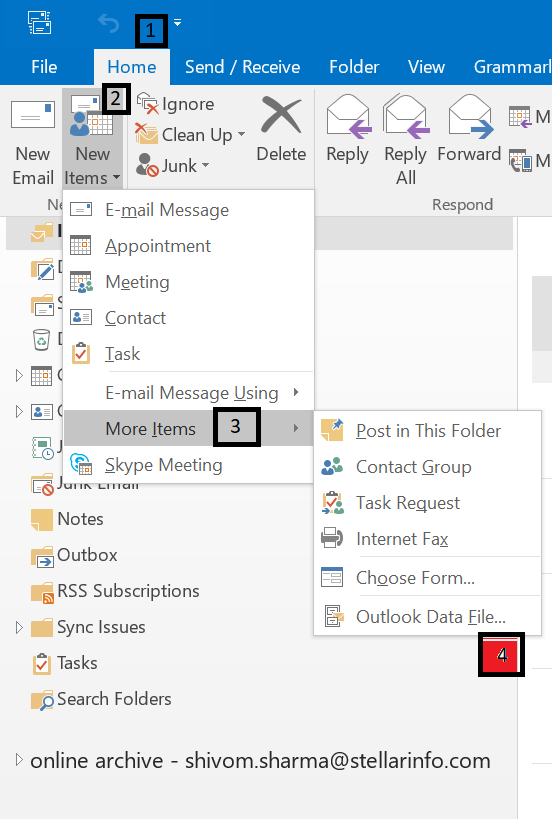
2. In this window, browse the preferred location, enter a file name for the new PST file and click OK. A blank PST file will be created and it will start to appear in the Navigation Bar of Outlook.
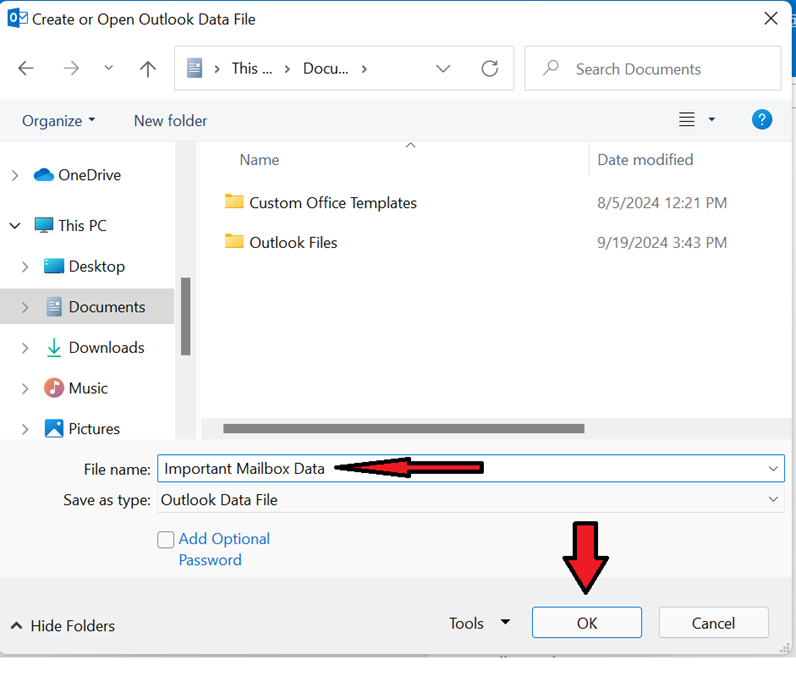
3. Drag and drop the emails you want to transfer from your OST file to this PST file one-by-one. You can also create folders within this PST file and sort your emails.
Although it is an easy method to transfer your mailbox data from OST to PST, it can be a time taking process as it requires user to drag and drop individual items and does not allow them to move entire folders into the PST using this method. Furthermore, this method does not work if your OST file is orphaned or inaccessible.
Method 2: Use Import and Export Wizard
If your Outlook profile and OST are accessible and the server mailbox is active, you can use Outlook’s in-built feature Import/Export Wizard to transfer the mailbox data in the OST to a PST file. Here’s how you can do it:
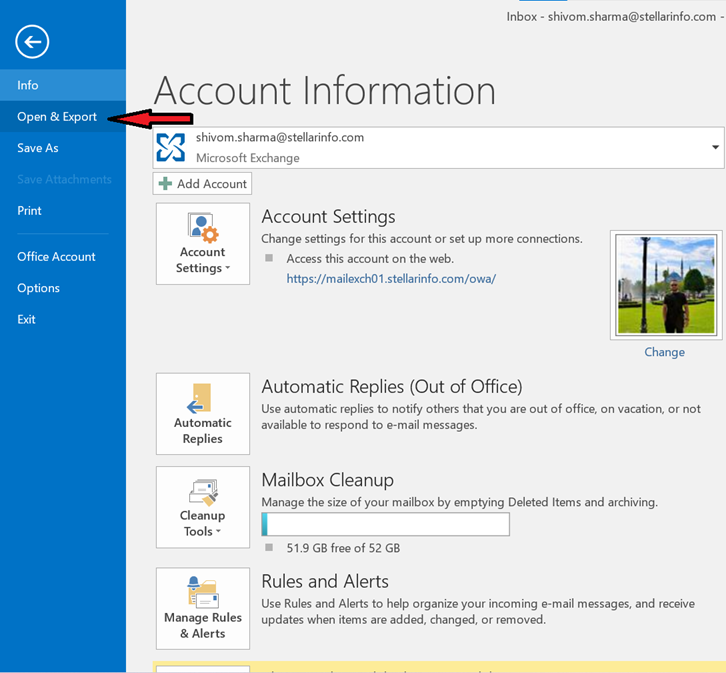
- Click File on the top left corner of the screen and select Open and Export.

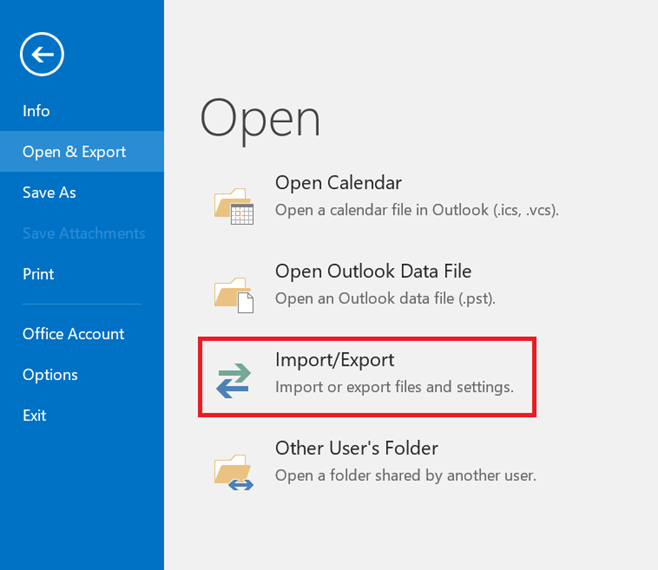
- Then, select Import/Export to open the Import and Export Wizard.

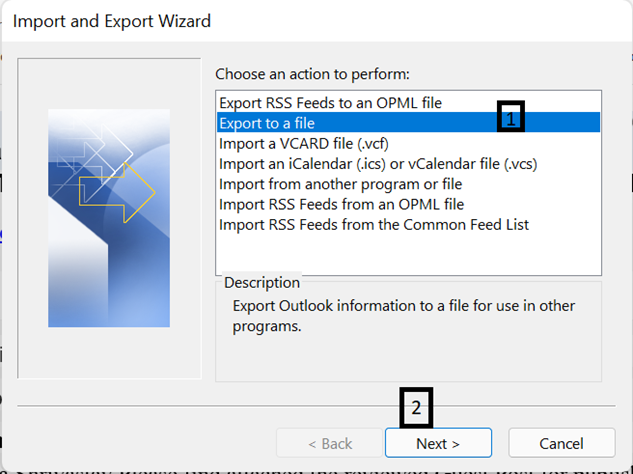
- In the Import and Export Wizard, select Export to a file option and click Next.

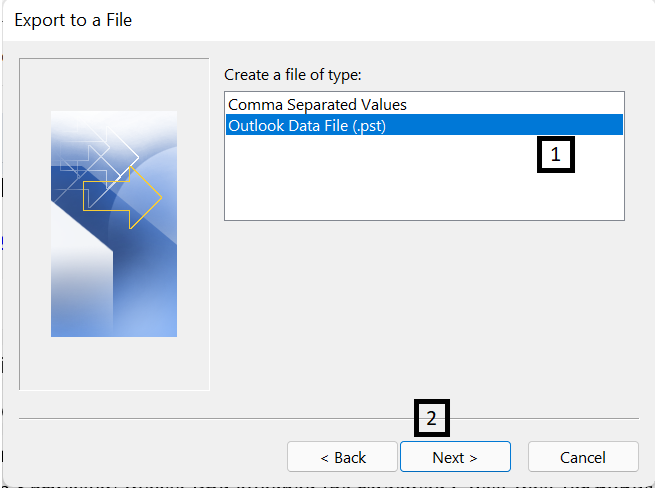
- Select Outlook Data File (.pst) and click Next.

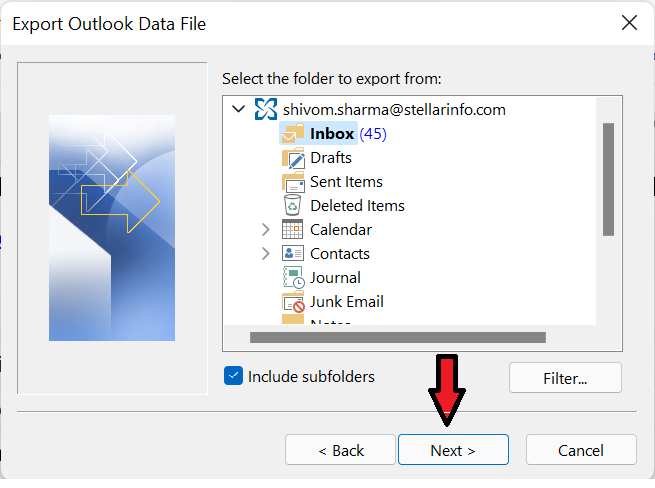
- Select the folders in your mailbox that you want to transfer from the OST file to the PST file, check Include subfolders option and click Next. If you want to export the whole mailbox, select your profile name on the top of the folder list.
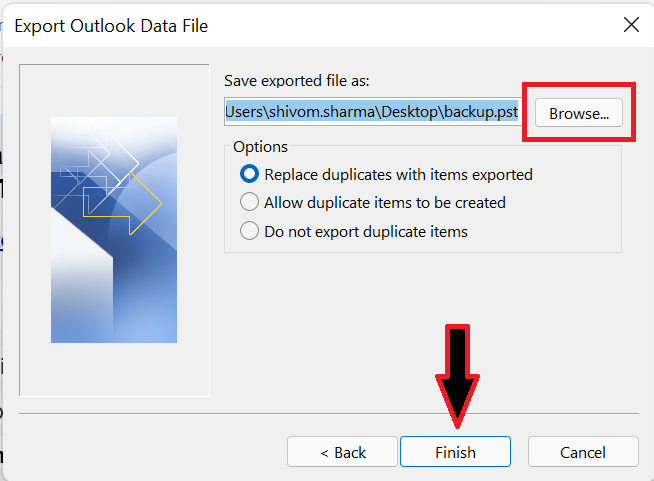
- Click Browse to select the location to save the PST file, click a suitable option from Options and click Finish.

- After clicking Finish, you will get an option to protect your PST with a password. Either put a password or simply click OK. This will start the export the mailbox data on your OST to the new PST file.
Method 3: Outlook Archive Feature
Archive option in Outlook, which is used to reduce the size of PST, can also be used as a workaround method to transfer your files from OST to PST. Here’s how you can do it:
- Open Outlook and go to on File > Info.
- If you use Outlook 2010 and 2013, go to Cleanup Tools > Archive. In Outlook 2016, 2019, and 2021, you can select File > Info > Tools > Clean up old items.
- Select the Archive this folder and all subfolders option. You can select the folder that you need to export to PST.
- Now, if you want to transfer mailbox data of a specific period to the PST file, enter an appropriate date range.
- Click Browse to select a location to save the PST file and then click OK.
Note: This method can only be used to transfer emails from an OST file to the PST file.
Method 4: Use a Professional OST to PST Converter Tool
Although the above methods help you transfer the mailbox data from the OST file associated with your Outlook account to a PST file, they work only when the mailbox data is accessible to Outlook. However, if the OST file associated with your Outlook account becomes orphaned or inaccessible, you can use a specialized OST to PST converters tool such as Stellar Converter for OST. This tool performs OST to PST conversion in a few clicks and gives you a preview of your mailbox data before exporting. Furthermore, it allows you to select particular folders or items to transfer into the new PST if you don’t want to export the entire mailbox. Here’s how it works:
- Download and install Stellar Converter for OST on your system.
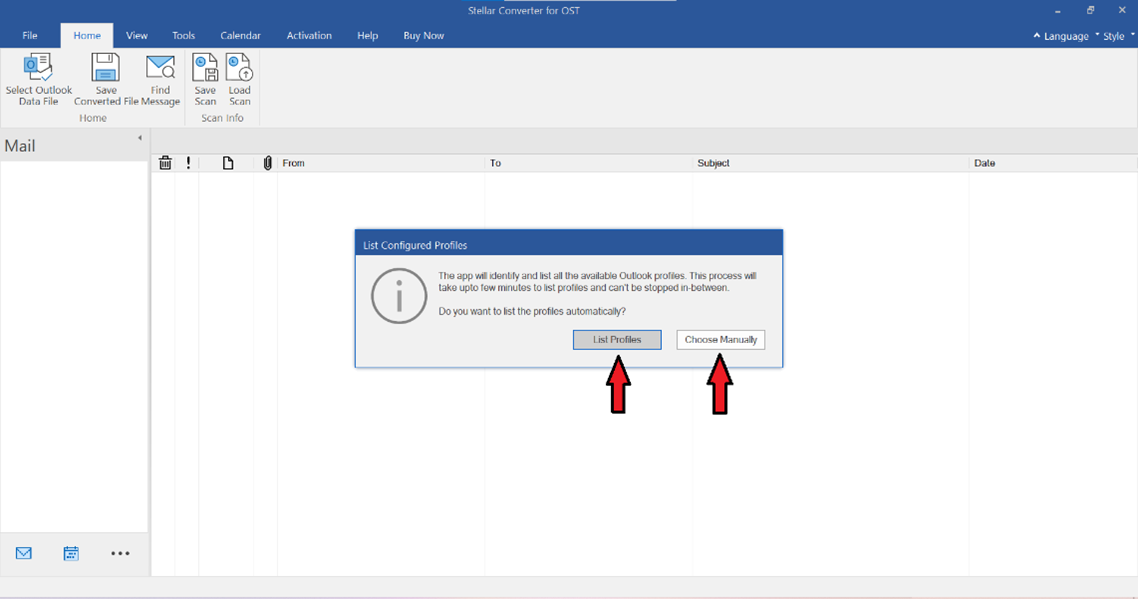
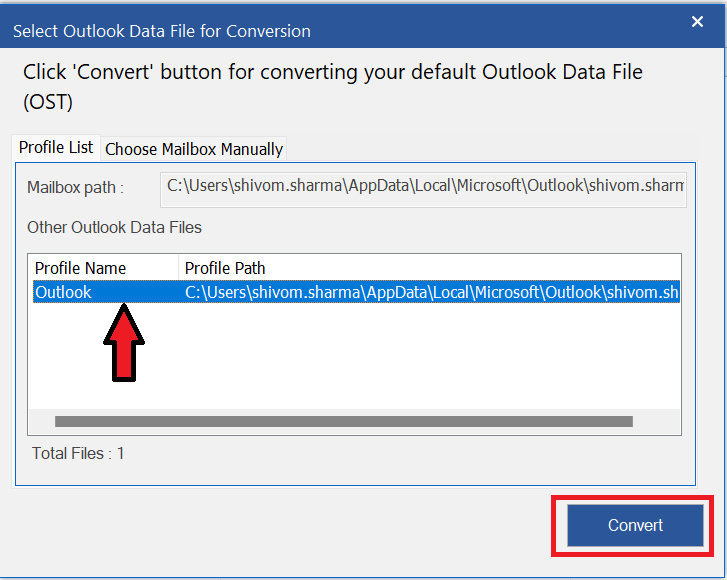
- Click Profile List to choose your OST file or click Choose Mailbox Manually to Browse and select the OST file that you want to convert to PST. If you do not know the OST file location, use the Find option.

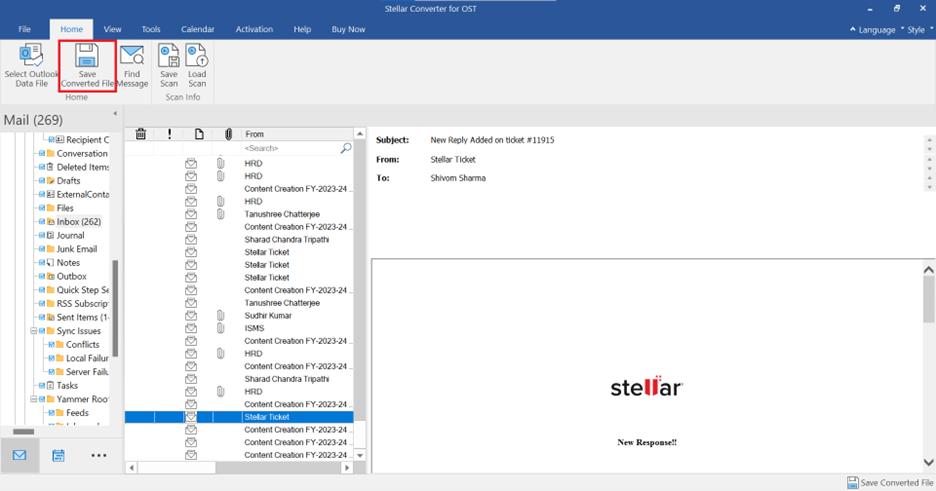
- After selecting the OST file, click on Convert to begin scan and conversion process.

- After the scan, you can preview all emails and other mail items. Select the items that you want to convert to PST. Then, click Save Converted File under the Home tab.

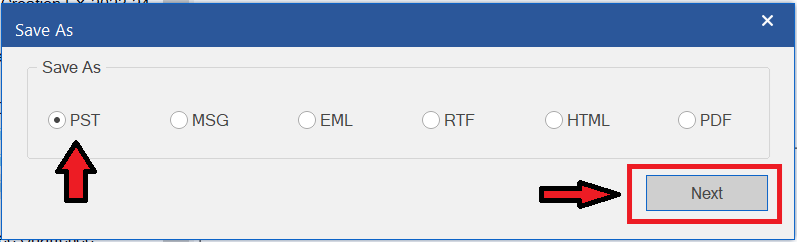
- From the options, choose PST and then click Next.

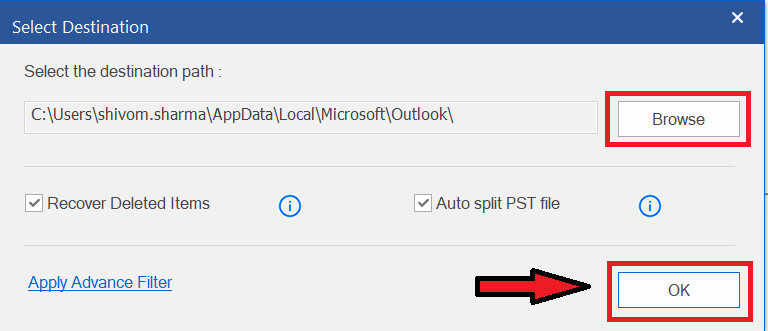
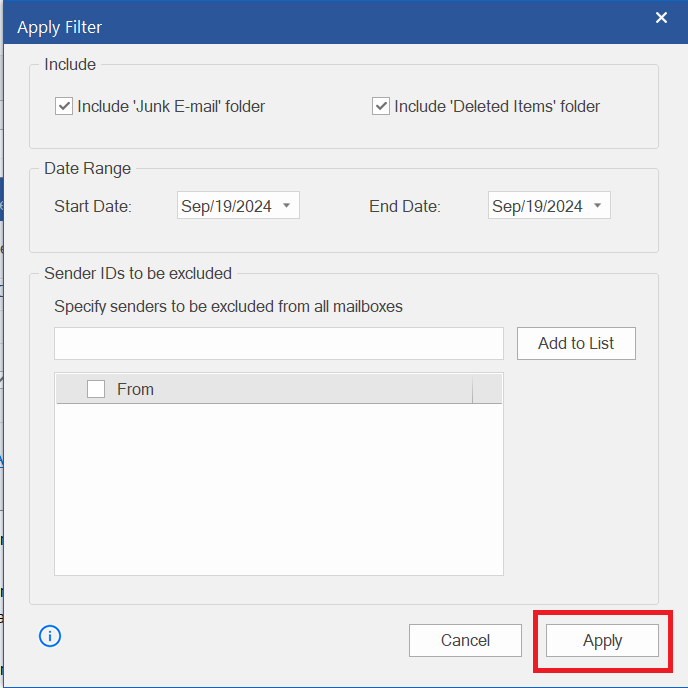
- Choose a destination path to save the PST file and click OK. You can also use the Advanced Filters option to transfer your mailbox data from a particular date range.


This will create a new PST file and transfer your mailbox data from your OST to a PST file, which you can import into Outlook or keep as a backup.
Conclusion
In certain situations, you might need to transfer your mailbox data from the OST associated with your Outlook account to a PST file. If you can access your mailbox data on Outlook, you can easily export your data to a PST by using Import/Export Wizard or Archive feature. However, if the OST file becomes inaccessible or orphaned, you can use an OST to PST converter tool, such as Stellar Converter for OST. This software allows you to convert an inaccessible OST file to an importable PST file in a few clicks. Additionally, you can get multiple OST files converted into PST and also split and compact the converted PST file.